DIY: Wood Storage Shed

by Susan Hu 03/01/2020

Photo by Maksim Shutov on Unsplash

Building a storage shed for wood can be advantageous for several reasons: it allows you to store your firewood properly.  When firewood is dry, your fire will be warmer, smoke far less, and you'll burn less wood at a time -- and a shed with good airflow that is slightly elevated will ensure your firewood stays dry.  Not to mention that a storage shed will ensure your woodpile is neat and tidy!

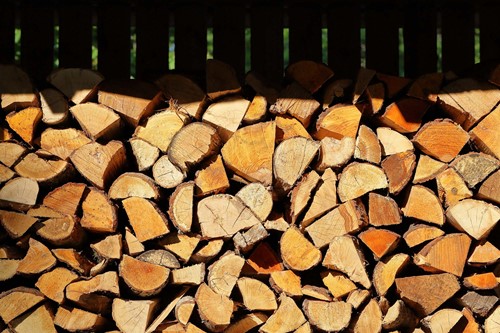
This set of instructions will produce a woodshed capable of holding about one cord of wood.

Materials

Lumber

  • Three 4" x 4" x 12' 
  • Two 2" x 6" x 8'
  • Eight 2" x 4" x 8'
  • Thirteen 1" x 4" x 8'
  • One 4' x 8' x 19/32" plywood (OSB or CDX; see notes below) 
  • Hardware

  • Twelve 1/4" x 5" hex lag screws
  • One, 1-lb. box of 1 1/2" T25 deck screws
  • One, 1-lb box of 3" T25 deck screws
  • Other

  • One 5-Gal. bucket of rubber roof
  • Six 12" x 8" x 12" deck blocks
  • Directions

    If you have the opportunity to get your wood cut at the hardware store, this is a great time-saver.  If not, start by measuring out and cutting your wood down to what is described in the sections below.

    Make the floor frame

  • The 2" x 6" by 8' lumber will form the front and back of your woodshed; the 2" x 4" x 45" will form the sides.  Attach these together with the 3" deck screws, using two screws at each join.
  • Next, take five pieces of 2" x 4" x 4' lumber and place these equidistant atop the frame to make the joists.  Be sure to line up your first and last joists so that they are flush with the front and back of the frame.  Fix these in place using two, 3" deck screws on both sides of every joist, for a total of 20 deck screws on the five joists.  Set the remaining three joists aside.
  • Set the floor frame up off the ground either using the deck blocks or two pieces of lumber.  This will ensure you can attach your 4 x 4 posts extending slightly below your frame.
  • The posts at the back of your shed should measure 4' x 4' x 5' 6", and your front-facing posts should measure 4' x 4' x 6'.  There should be six posts total, three for each side.  Attach your posts to the inside corners of your frame and one additional post at the midpoint of your two longest sides.  Use 3" screws to hold your posts in place while you work on the rest of the shed.  Be sure that your posts extend 3 1/2" below your frame.
  • Add your remaining joists snug around your posts, such that there is a joist on either side.  Secure with 3" deck screws as you did in #2.
  • Fix your posts into place permanently into the 2" x 6" x 8' floor frame using 1/4" x 5" lag screws, two facing outward, two facing inward.  You should use four lag screws on each post.
  • Take your 1" x 4" x 8' lumber and orient it at right angles to your joists.  Fix in place using two, 1 1/2" deck screws at each end of every floor joist wherever they touch.
  • Make the walls

  • Use 1" x 4" x 89" lumber to form the back slats of the storage shed.  Attach these equidistant along the outside of the back wall using two, 1 1/2" deck screws wherever the slats touch the frame.
  • Use 1" x 4" x 45" lumber to form the side slats of the storage shed.  Attach as you did the back slats in #1.
  • Set your frame on the deck blocks, concrete blocks or stones you have set aside for this purpose and adjust the shed to sit in its final, desired position.
  • Make the roof

  • Attach 2" x 4" x 4' lumber to both sides of the tops of your posts using two, 3" deck screws everywhere your lumber touches a post.  Your rafters should slant at approximately a 25-degree angle when you align your lumber with your taller and shorter posts.
  • Place the 4' x 8' x 1/2" plywood atop the roof joists.  Secure with 1 1/2" deck screws every half-foot everywhere your roof touches a rafter.  Note: CDX plywood may produce a longer-lasting roof that is less likely to bow, while OSB is fine for flooring. 
  • Apply rubber roof, following the manufacturer's instructions closely.  If desired, add roofing material to extend the life of your woodshed.

  • This entire woodshed costs less than $250 to build and will take one afternoon's work for two people, whereas a pre-made woodshed can cost $1,000 or more.  If you can use leftovers from other projects, it can cost even less!  Ensure yourself a cozy winter with this one-weekend DIY.

    About the Author
    Author

    Susan Hu

    Susan Shuxian Hu has been a dedicated realtor serving in Silicon Valley since 2010. With great passion, outstanding negotiation skills and due diligence, she has helped many buyers and sellers in their real estate needs. Living in West San Jose for more than 14 years, she has broad knowledge in Cupertino, West San Jose, Los Altos and Saratoga. She has enormous patience working with buyers and never tired of showing all possible properties that may fit client’s needs. Clients appreciate her best service to their satisfaction. She specialized in luxurious real estate purchase in Los Altos, Cupertino, Saratoga and Palo Alto. She also helped friend and past client’s referral working in San Francisco, Foster City and far reached Bay Area.

    Susan Shuxian Hu was graduated in East China Normal University in Shanghai with bachelor and master degrees in Bio science. She came to US in 1989 and earned her Ph.D. in Molecular Genetics in Texas A&M University in 1996. After one year of postdoc in Southern Florida University in Tampa, she moved back to Orlando with her family and started working in Lucent Technologies. In 2002, Susan moved to California, Silicon Valley joined a start-up company. Since then she worked in high tech Corporation till 2009. Driven by her dream job pursuing, she found her passion working in sales by helping people in real estate after one year of education in De Anza business and real estate law study. Since then, she has been serving many people in Bay Area for their real estate needs.

    With bilingual advantage, she has been actively working with Chinese immigrants as well as local engineers and residents. With rich high tech background and connection with Chinese community, Susan has served in luxurious real estate in last a couple of years.